Scan Settings in the Neat Smart Organization System
Please Note: Neat Web App now has ALL of the desktop features, and so much more! You can continue to use this desktop application, however, all new features, improvements, and updates will occur in our Neat web application. Click here to learn more!
Learn about scan settings in the Neat Smart Organization System. The Smart Organization System makes it easy to change the settings for your scans with its persistently visible scan settings menu. We'll walk you through the various scan settings below.
How to Access Scan Settings
- Click Scan.
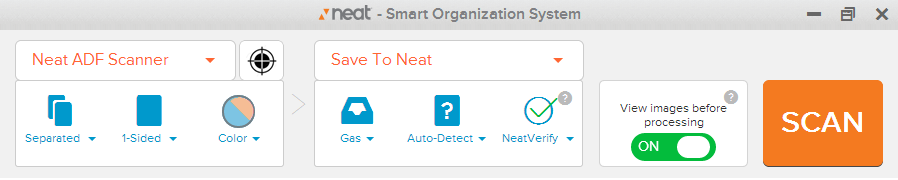
- A Neat Scan window will appear.
This is where you can adjust your scan settings.
Change your Scan Settings
Separated / Combined Scanning
- Click on the drop down menu to choose to keep the items you scan Separated or have them Combined into one item.
Single Sided / Double Sided Scanning
- Click on the drop down menu to choose to scan 1-Sided or 2-Sided items.
Color / Black and White Scanning
- Click on the drop down menu to choose to scan items in Color or in Black and White (B/W).
Scan Location
- Click on the drop down menu to choose which folder Location you would like the scanned item to be saved in.
Item Type
- Click on the drop down menu to choose whether you want Neat to Auto-Detect the type of item you are scanning in or select the item type from the drop-down menu.
Neat Verify
- Click on the drop down menu to choose whether you want to apply NeatVerify credits to the items you scan or turn the service off using the drop-down menu.
Review Scans
- Click on the drop down menu to choose whether you want to review images of your scans before processing them by sliding the View images before processing button to the On or Off position.