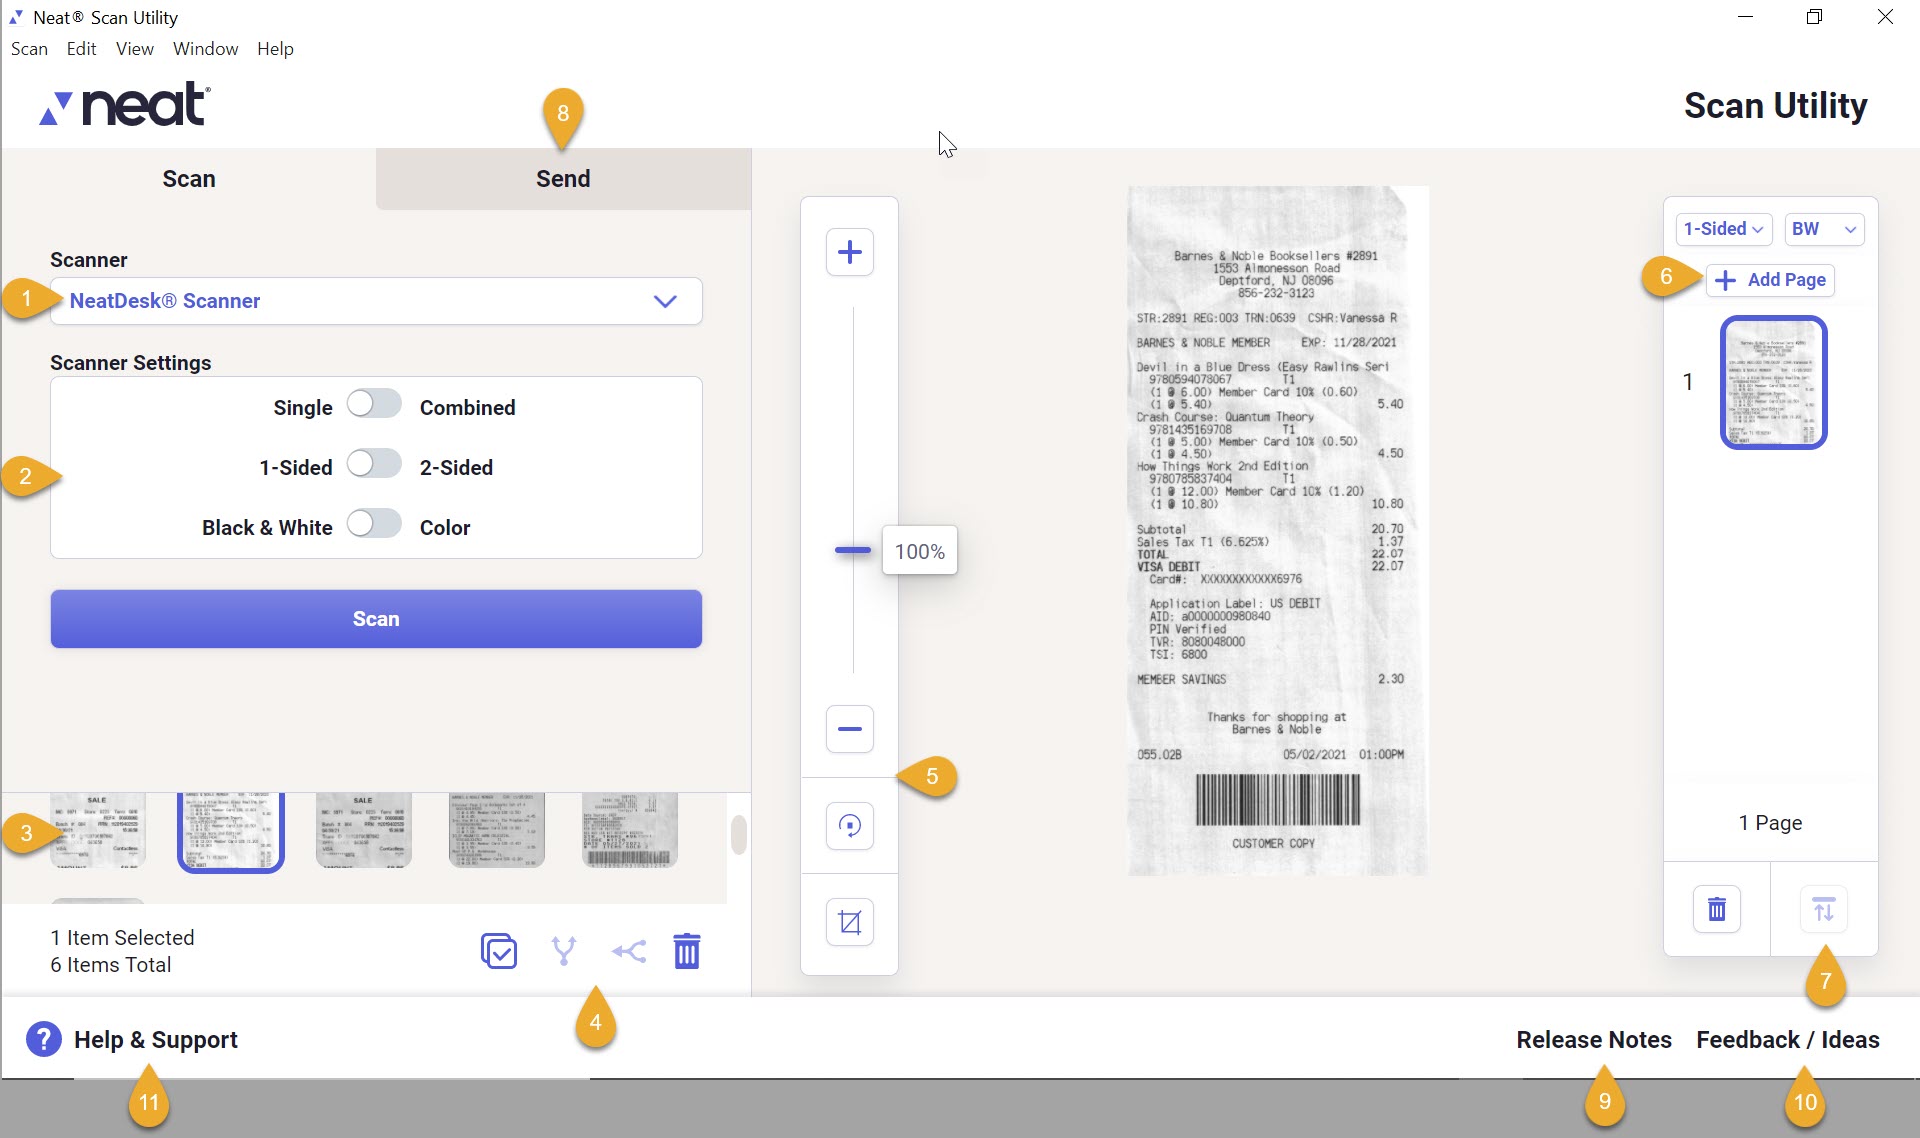
The Neat Scan Utility (NSU) for desktop is a free utility. With a Neat Scanner or other TWAIN-compliant 3rd party scanner, you can use the Scan Utility to scan items to the full Neat solution or to your computer's hard drive. Review the FAQs below for more information
about the Scan Utility.
Select Scanner Switch between multiple connected scanners.
Scanner Settings Change scan settings like; color mode, 1-sided or 2-sided scanning, and single or multipage scanning.
Recently Scanned View and select recently scanned items to edit and send to Neat.
Manage Recently Scanned Items Select all or multiple items to manage. You can separate or combine recently scanned items before sending them to Neat.
Image Editor Crop, rotate, and zoom recently scanned items before sending them to Neat.
Add Page Settings Set scan settings and add pages to recently scanned items.
Move / Delete Pages Reorder and delete pages to recently scanned items.
Send Toggle to the 'Send' tab to select where to send scans. You can send scans to Neat or to your computer hard drive.
Release Notes See notes on newly added functionality and features in Neat to make the most out of your experience.
Feedback / Ideas Share your thoughts and feedback about Neat and your experience in the Ideas Portal! All changes in Neat are a direct result of customer feedback!
Help & Support Quickly access the Neat Help Center articles and walkthroughs or open a case with support.
What are the system requirements for the Scan Utility?
Microsoft® Windows 10 (32 and 64-bit) or Mac OS 10.12 or higher
Pentium® IV 2.0+ GHz or faster (Dual Core recommended)
1 GB RAM; 2 GB highly recommended
1 GB of available disk space for installation, 1 GB recommended for user data
Available USB port
How do I Scan with the Scan Utility?
To scan, first connect a scanner to your computer.
Use the scanner drop down, or #1 above, to select your connected scanner.
Set your scan settings, or #2 above.
Once your scan settings are set, click the Scan button.
Your scanned item(s) will appear in the recently scanned section, or #3 above.
Please Note: Neat scan drivers are available here. Regardless of your scanner brand or model, you cannot scan without first installing the scan driver.
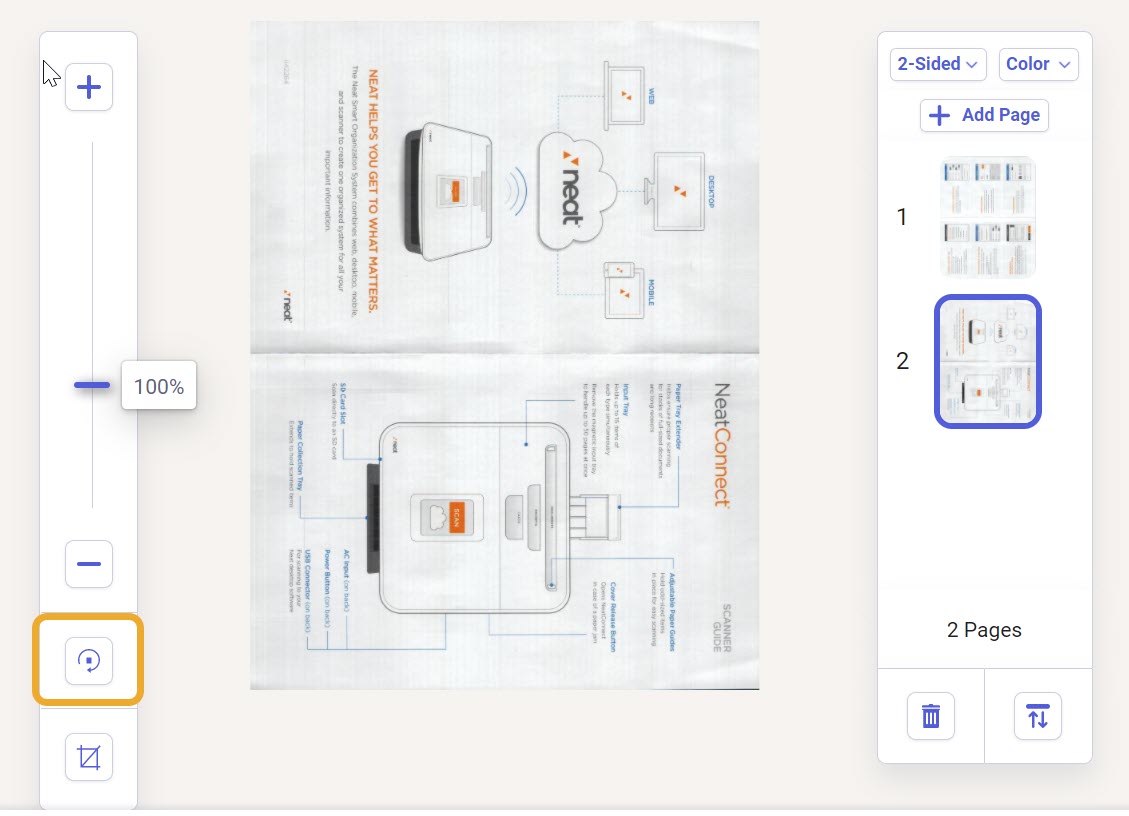
How can I edit scanned items in the Scan Utility?
Before sending items to Neat Cloud or saving them in a separate location on your computer, you can rotate, crop, and change the page order of your scanned images.
To Rotate:
Click the Rotate button to the left of the image to rotate the image a quarter turn clockwise. Click Rotate until the image is oriented as desired.
Click Save to finalize the result.
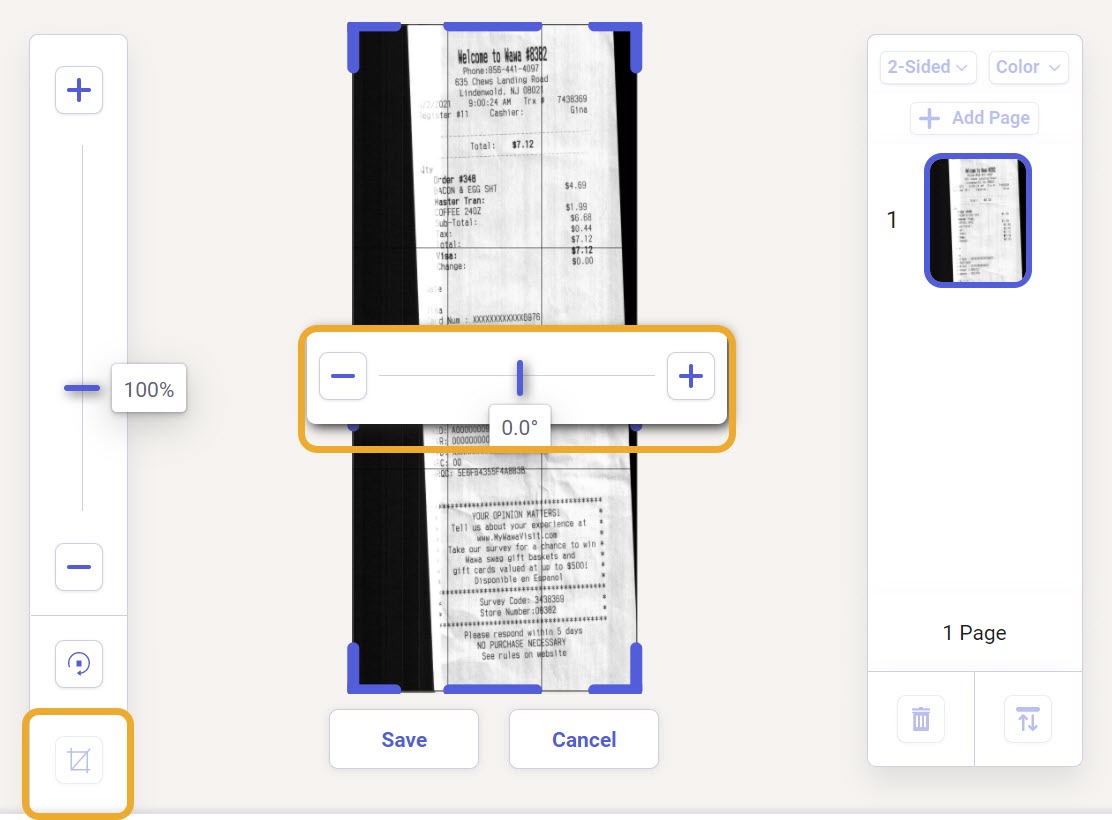
To Adjust Skew:
Click the Crop button indicated below to view the skew adjustment buttons. They appear in the center of the image in a rectangle. Press the plus (+) or minus (-) buttons to fine tune the skew as needed. Use the intersecting
guidelines for added precision.
When finished, check you are not cropping anything out of the image before you click Save to keep your changes. (See below for details.)
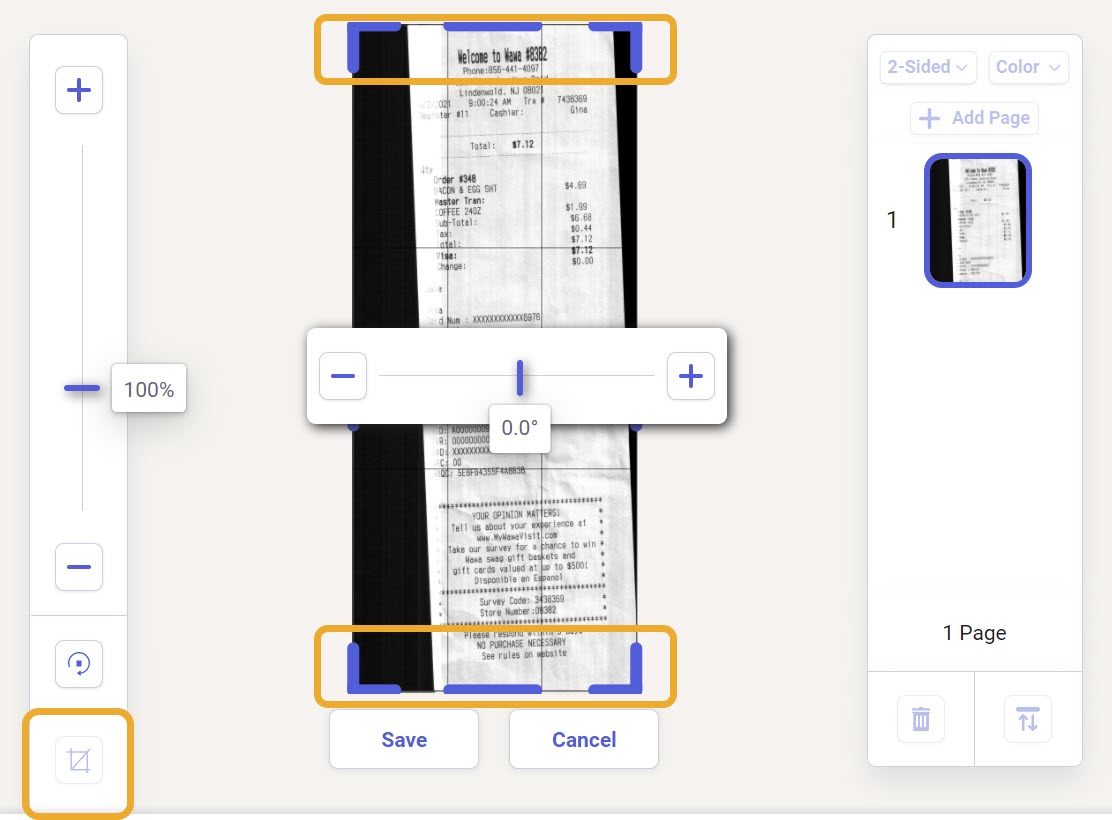
To Crop:
Click the Crop button indicated below to edit out portions of the image along the border. Use the white circles seen at the sides and corners of the image border to resize the image.
When you click Save, anything outside the new border will be removed from the image.
To Change Page Order:
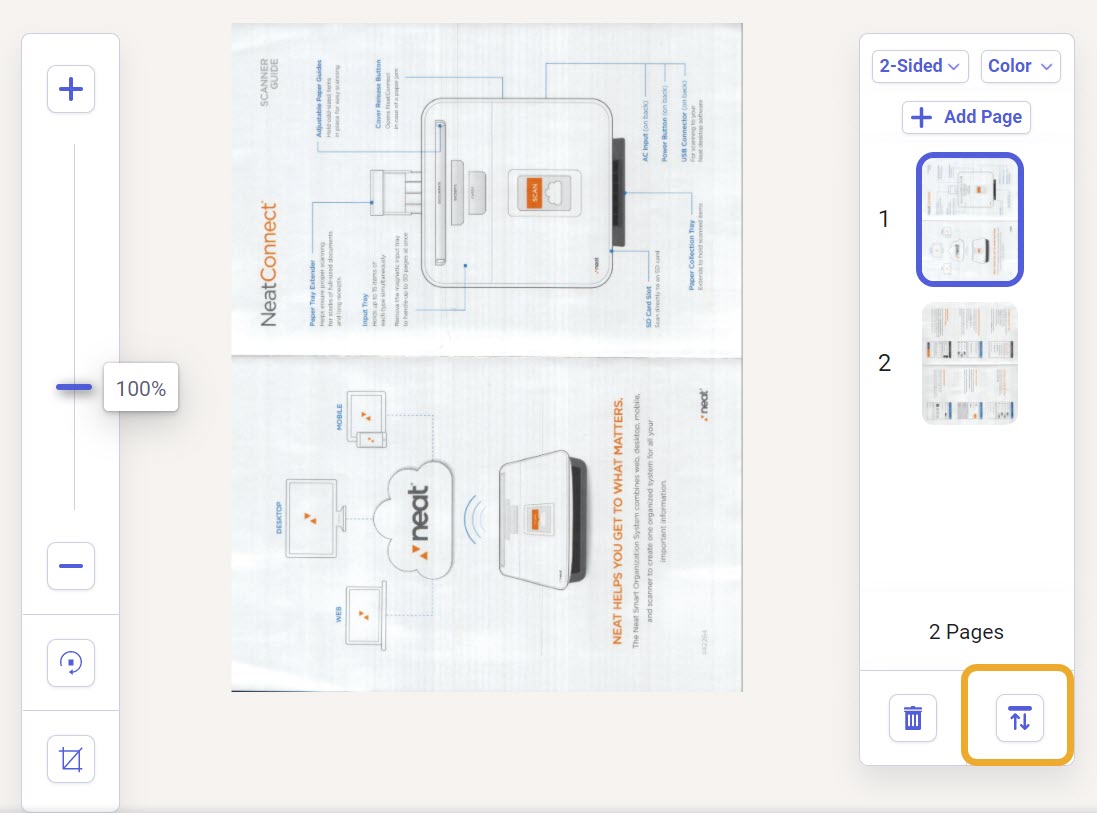
To reverse the order of pages in a multi-page document, click the Sort button at the bottom of the page column which appears to the right of the displayed document.
To rearrange page order manually, click on a page in the column and drag it up or down to relocate the page in the item.
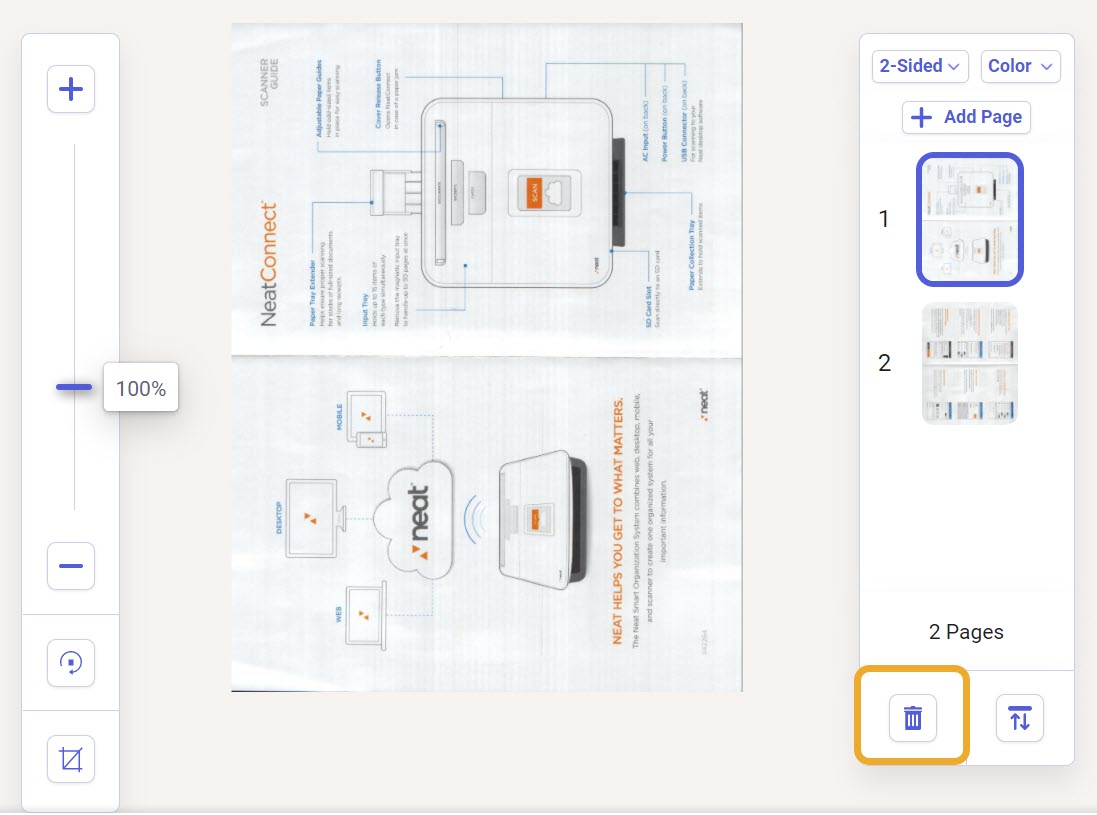
To Delete a Single Page:
To delete a single page within a multi-page document, select that page from the page column to the right of the displayed item.
Click the Trash icon at the bottom of the column.
Click Yes to confirm you want to delete that page.
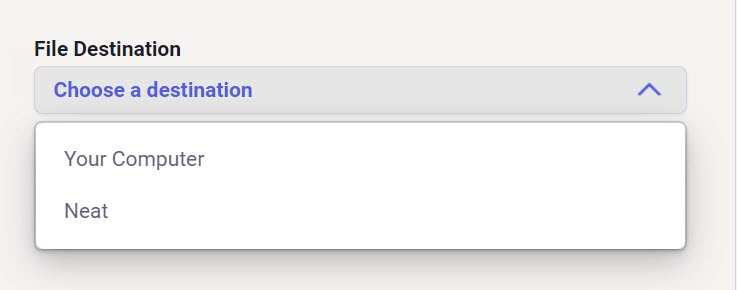
How do I send items from the Scan Utility to the Neat Cloud?
To send items, first select the Send tab, see #8
above.
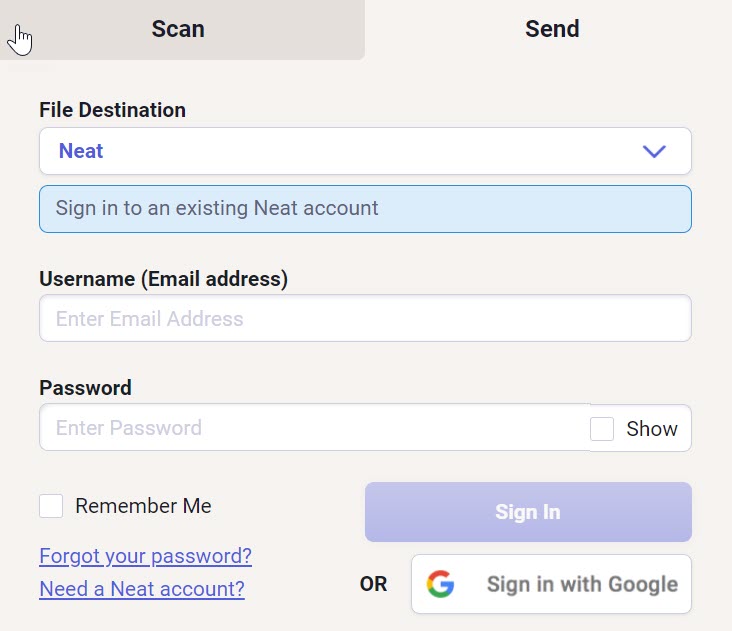
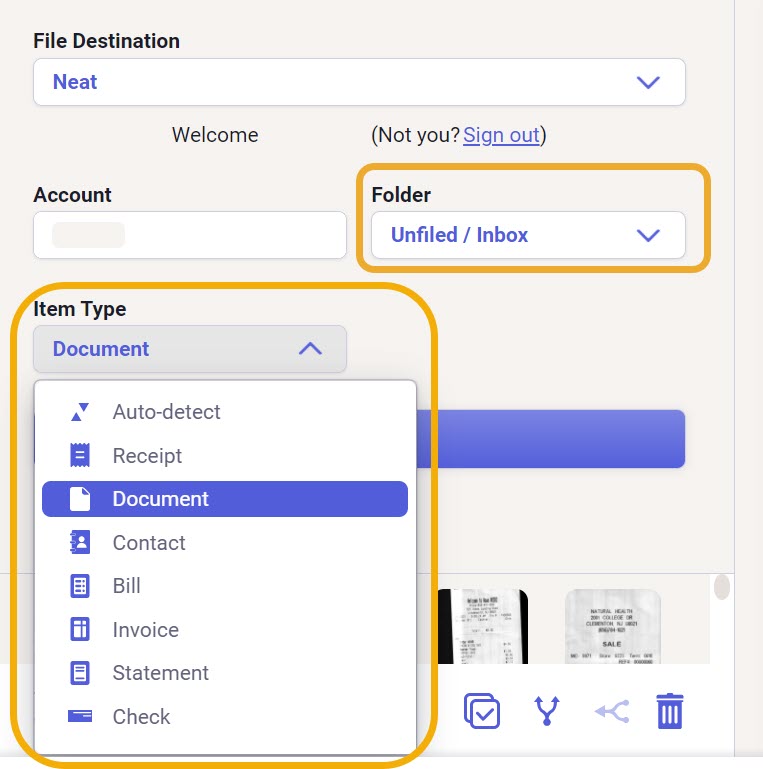
In the File Destination drop down select Neat.
Select Neat, and sign in to your Neat account if you haven’t done so already.
Once signed in, you can select what type of item you will be sending and where you want to send it in your Neat database, by clicking on Folder and selecting a folder from your list of Neat folders.
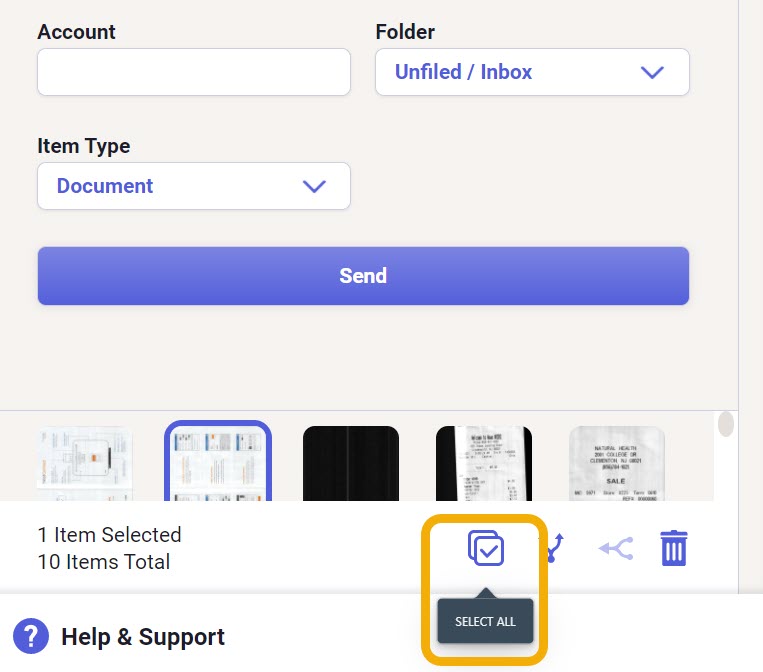
Select which item(s) you want to send from the recently scanned section, or #3 above.
Neat Tip!:
Use the Select All button to include all available items with just one click.
To select some but not all items, hold the Ctrl key on your keyboard while clicking on all the items you want to send to the Neat Cloud. You can tell which items are selected,
as they will have a blue border around them, like the image below.
Click Send.
Your item(s) will be uploaded to Neat to the folder you selected. Once sent, the item will disappear from your recently scanned items.
Please Note: You can either send items to Neat or save them on your computer but not both. However, you can import items saved on your computer into Neat.
How do I save scanned items on my computer?
To send items, first select the Send tab, see #8
above.
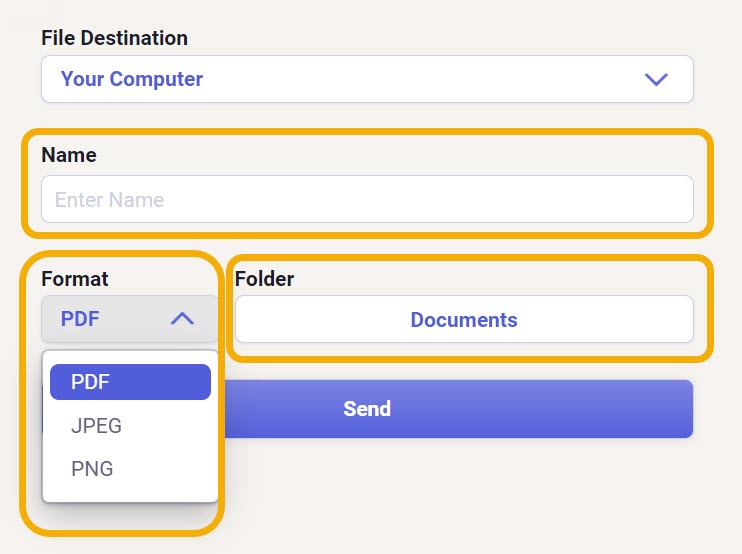
In the File Destination drop down select from Your Computer.
You will need to
a) enter the file name to save your image,
b) choose the file format (pdf, jpg, or png), and
c) choose the folder on your computer where your item will be saved.
Click Send and your item will be saved.
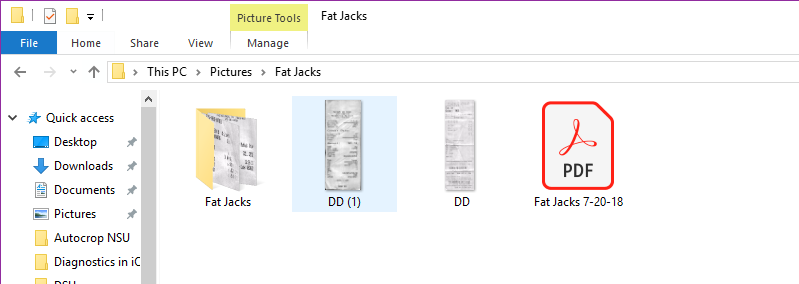
When you open the folder where the item was saved it will appear with the file name you chose and if given the same name as an item already saved in the same location it will have a unique number appended to the name.
If you saved a multi-page item as a jpg or png file, a new folder will be created in the destination folder you chose with an image for each page. Each image file will have a file name that includes the name you chose and a page number.
Please Note: You can either send items to Neat or save them on your computer but not both. However, you can import items saved on your computer into Neat. You can also scan or Print to Neat twice to have one copy for saving and one for sending to Neat.
What do I do if my Neat scanner won’t connect?
If you are having trouble connecting your Neat scanner to the Scan Utility, then disconnect your scanner and make sure you have the
latest driver for your scanner installed.
If you have difficulty installing your Neat scanner driver, then check out this
Help Center article for assistance.
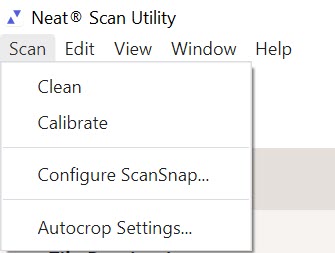
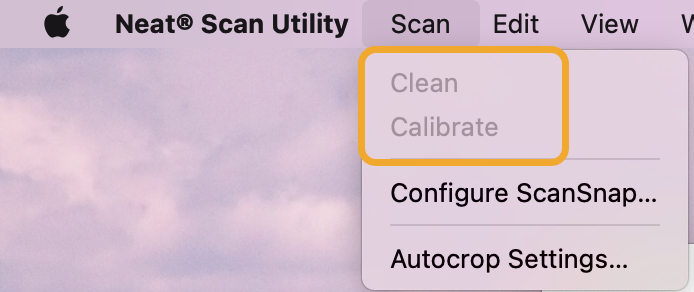
How do I clean and calibrate my scanner with the Scan Utility?
Please Note: Clean and calibrate will only work on a Neat scanner. To clean or calibrate a 3rd party scanner, please refer to software that came with your 3rd party scanner.
To Clean:
Click Scan in the menu bar.
Windows:
Mac:
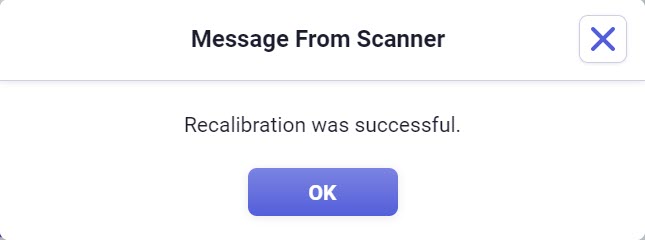
Load a cleaning sheet into the scanner and click Clean.
The scanner will pull the cleaning sheet through the scanner. When done, a success message will pop up in the Scan Utility.
To Calibrate:
Click Scan in the menu bar.
Windows:
Mac:
Load a calibration sheet into the scanner and click Calibrate.
The scanner will pull the calibration sheet through the scanner. When done, a success message will pop up in the Scan Utility.
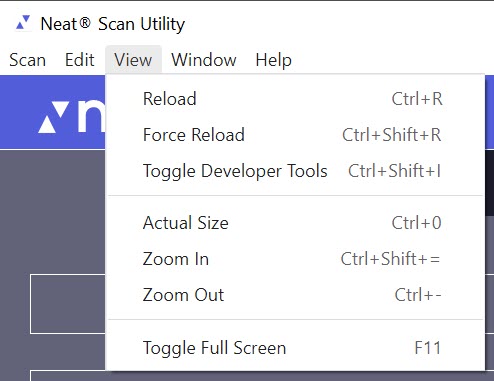
What is the View tab for?
The View tab provides the following options:
Reload/Force Reload - Reloads the Neat Scan Utility without having to close and re-open the utility.
Toggle Developer Tools - Allows access to developer features that can aid in troubleshooting technical issues.
Actual Size - Returns you to default size after you have used Zoom In or Zoom Out.
Zoom In/Zoom Out - Alters the view of the entire Neat Scan Utility to appear further away or closer.
Toggle Full Screen - Turns full-screen mode on or off.
How do I combine or separate files after scanning?
Click here, for steps on how to combine or separate items that you have already scanned to the Neat scan utility.
What is the Autocrop Setting?
Autocrop Settings allow you to adjust how aggressively the Neat scan utility will automatically crop an item as it is scanned in.
Increase Autocrop
To make the autocropping more aggressive:
Click the Scan Tab, at the top of the utility next to Edit and View.
Then Autocrop Settings.
Then click on the drop down and select a larger number like .80.
Close the autocrop settings window, your changes are saved automatically.
You can test different settings to find the one you like the most.
Decrease Autocrop
To make the autocropping less aggressive:
Click the Scan Tab, at the top of the utility next to Edit and View.
Then Autocrop Settings.
Then click on the drop down and select a smaller number like .20.
Close the autocrop settings window, your changes are saved automatically.
You can test different settings to find the one you like the most.
Turn Autocrop Off
To turn Autocropping off altogether:
Click the Scan Tab, at the top of the utility next to Edit and View.
Then Autocrop Settings.
Then remove the check mark in the check box next to Autocrop.
Close the autocrop settings window, your changes are saved automatically.
Can I use the Scan Utility with a ScanSnap scanner?
Yes, using the latest version of ScanSnap Home, you can scan items and send them to Neat via the Neat Scan Utility. You can download the Neat Scan Utility or access ScanSnap Home support from this page:
Neat and ScanSnap Home
Why are the file sizes of my local scans so large?
Scans that you save directly to your computer, instead of to Neat, will be larger in size because they are not being optimized on the cloud by Neat. One way to reduce the file size is to send your scanned items to Neat and then
export them to your computer.
However, you can also create a configuration file to adjust the image quality of your scans which will also adjust the file size. Follow the steps below closely to create the configuration file.
Close the Neat Scan Utility.
Open a brand new blank text file to create the .config file. Use Notepad on Windows or TextEdit on Mac.
Type or copy and paste the text below adjusting the number as desired:
{
"quality": 20
}
Please Note: The default image quality is 60. The example above is set to 20 which should result in a notably smaller file size which is comparable to the result of uploading and downloading scanned items from Neat. The quality can be adjusted anywhere from 1-100. The lower the number, the lower the image quality and file size.
Save the file in one of the following locations depending on the operating system.
Replace "[username]" with the actual username you use to log into your computer.
Windows:
C:\Users\[username]
Mac:
Macintosh HD/users/[username]
Please Note: It cannot be placed in a different location because this is where the utility will check for the .config file.
Name the file. The exact file name must be:
NeatScanUtility.config
Launch the Neat Scan Utility for changes to take effect and test results by scanning.
If you need to adjust the setting, close the Neat Scan Utility and open the NeatScanUtility.config file to change the number and save again before trying another scan.
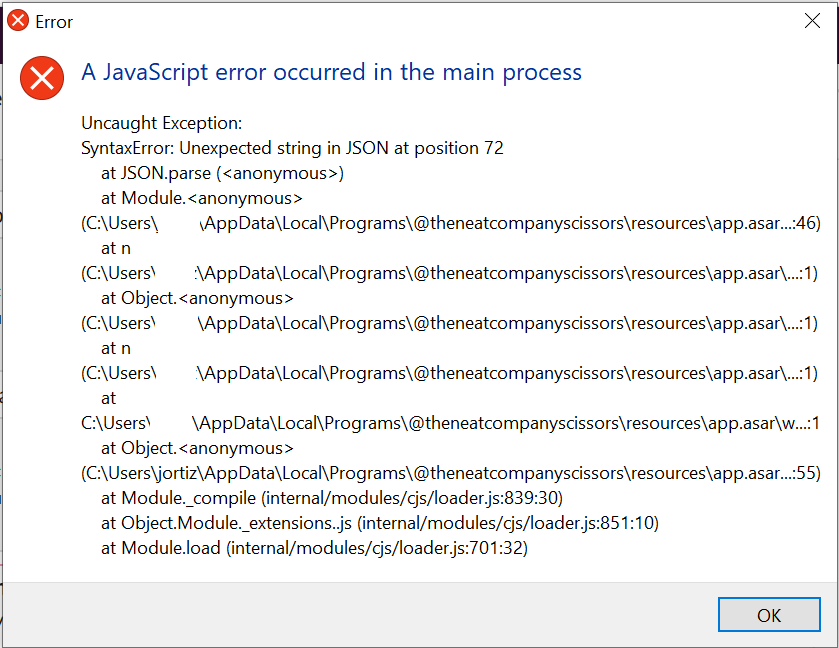
If, upon launching the Neat Scan Utility, you receive the javascript error shown below, you can double check the NeatScanUtility.config file to check if anything was misstyped and correct it. Likewise, you can also delete the .config file and start fresh to create a new one. Deleting the file will allow the utility to open with the default scan quality.
What can I do if it keeps spinning when I try to log in from the Neat Scan Utility?
This is only seen in Windows. If the NSU seems to be stuck spinning after you enter your login credentials, as a quick temporary fix, you can simply click View > Reload from the upper left.
To resolve this completely, you should clear the contents of the Neat® Scan Utility folder shown below to clear NSU cache. Replace [[UserName]] with your actual username:
Windows - C:\Users\[[UserName]]\AppData\Roaming\Neat® Scan Utility
Note that, by default, AppData is a hidden folder in Windows. You may need to show hidden files in Windows to see it.