Neat Smart Organization System - Integrate QuickBooks Desktop
Please Note: Neat Web App now has ALL of the desktop features, and so much more! You can continue to use this desktop application, however, all new features, improvements, and updates will occur in our Neat web application. Click here to learn more!
Learn how to activate your QuickBooks Desktop account as a connection in the Neat Software.If you have already set up your QuickBooks connection in Neat, click here for exporting instructions.
[[https://www.youtube.com/embed/QCjKqt6wh5k]]
Please Note: These steps are for QuickBooks Desktop accounts only. For steps on connecting your QuickBooks Online account to Neat please click here.
![]()
Before you Begin
- You must have QuickBooks (Desktop) Pro, Premier and Enterprise, 2009 and forward for Windows.
- QuickBooks Desktop must be installed on a Windows computer.
- You must be logged into your QuickBooks Desktop account as an administrator.
- QuickBooks must be open to the Company that you wish to connect Neat to.
- You must install the Neat Sync Manager onto the same computer that has QuickBooks Desktop installed on it.
Please Note: These steps are for Windows QuickBooks versions ONLY. However, once the connection has been made (using a Windows computer), Mac users can use their Neat software to map and export data to QuickBooks Desktop.
Activate QuickBooks in the Neat Smart Organization System
- Click on the small down arrow next to your username at the top right of the screen and click My Account. On the Account Settings page, click on the Connections tab.

- Click Connect, next QuickBooks Desktop, and you will then start the QuickBooks Desktop integration guide.

- Click Continue.
- Before you begin, you will need to download the Neat Sync Manager Setup and enter a token code into the application to connect your QuickBooks Desktop account to Neat. Click on Click Here to Download and the Neat Sync Manager will begin to download to your computer. Access the download, and double click on it to run the installer.


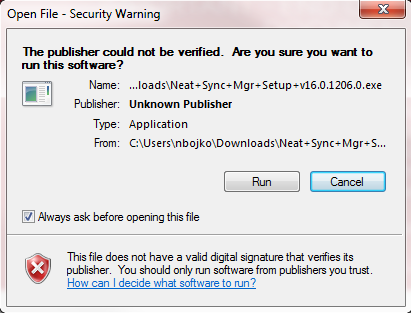
- You may receive a security warning, click Run to continue.

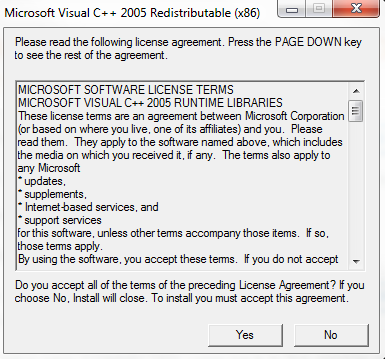
- You may also need to agree to a Microsoft Visual C++ 2005 license agreement. Click Yes to continue.

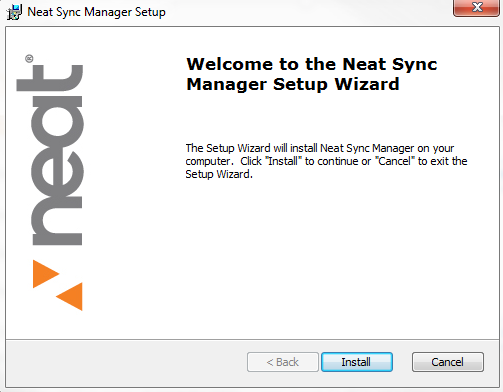
- Then the Neat Sync Manager Setup Wizard will open. Click Install to continue.

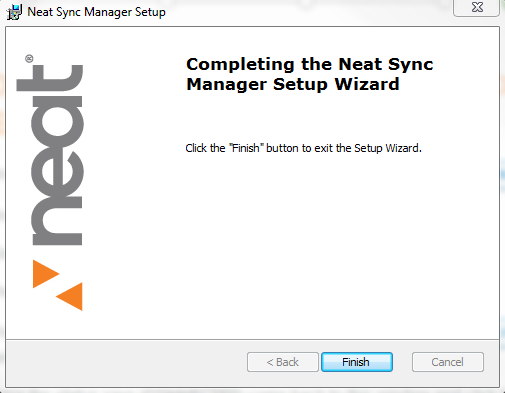
- After the Neat Sync Manager has been installed, click Finish to continue.

- The installation wizard will close and the following icon will be on your desktop. Double-click on the icon to launch the Sync Manager.

- A window will open and you will see a place to paste your token code. Go back to the Neat software and locate the token code, copy it, and paste it into the Neat Sync Manager application. Choose Save to continue.


You will see the statue change to Connected. - Once the Neat Sync Manager shows you are connected, which back to the Neat Cloud Powered software and click continue.

- Almost Done! Open the QuickBooks company file you want to connect to. Make sure the you are logged into the company file as the Admin and make sure you are running in Single User Mode.
- Switch back to the Neat Cloud Powered software and click Continue.

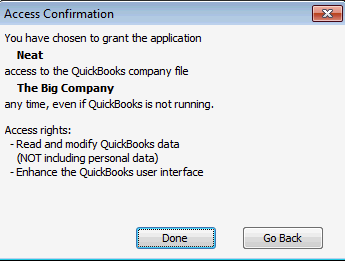
- Then switch back to QuickBooks. After a couple moments a QuickBooks Application Certificate will open to validate the connection with Neat. Put a mark in Yes, always; allow access even if QuickBooks is not running and choose Continue.

Choose Done on the Access Confirmation page.

Now that your Neat software is connected to QuickBooks desktop, you will need to map your Neat data to your QuickBooks account.
To add another QuickBooks desktop account to Neat, click here.