A. Destinations & Accounts
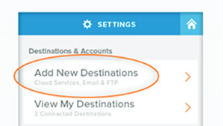
- Add New Destinations – Tap to log into additional cloud services (e.g. OneDrive), email accounts (e.g. Yahoo), and FTP network locations.
- View My Destinations – Tap to review which accounts have already been added as well as to remove them from NeatConnect
B. Advanced Scan Options
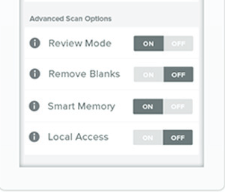
- Review Mode [default is on] – When turned on, you have the option to review (e.g. zoom in/out) and edit (crop, rotate, delete) your scans before sending them to a destination. When turned off, images will immediately be uploaded after scanning.
- Remove Blanks [default is on] – When turned on, NeatConnect will automatically delete blank pages from scanned items. This is particularly helpful when doing 2-sided scanning with a mix of papers where some have content on the back and others do not.
- Smart Memory [default is on] – Automatically manages onboard memory by deleting the oldest-already-uploaded scans to make room for new ones. When turned off, NeatConnect will prompt you to actively delete older scans from the Outbox in order to free up memory for new scans.
- Local Access [default is off] — When turned on, NeatConnect will broadcast it’s own local Wi-Fi signal. You can then connect a nearby Wi-Fi device to NeatConnect so you can view all of the saved images in NeatConnect on that Wi-Fi device, allowing you to save those images directly to the device or to push them to other destinations from the device. This feature is helpful if you lose Wi-Fi in your home and office and you need to gain access to the images saved in NeatConnect. Click here to learn more about using Local Access mode.
C. Wireless
- View Available Networks – Tap to view all available Wi-Fi networks that you are in range to connect to. If your WiFi connection is not listed it is most likely Hidden. Either connect to a non-hidden network (if available) or temporarily make your hidden network visible.
- Forget All Networks – Tap to delete all saved credentials on NeatConnect for any networks you previously connected to.
D. Display
- Sleep [default is 5 mins] – To conserve energy, the scanner will automatically go to sleep after a period of time. You can adjust the timer by using the sleep setting. To wake the scanner out of sleep, you can either tap the screen or quickly press the power button on the back.
- Brightness [default is 80%] – Adjust how dim or bright the screen display is to accommodate different ambient lighting conditions.
E. Security
- Passcode Protect [default is off] – To prevent unauthorized use of NeatConnect you can passcode protect the device. When Passcode Protect is turned on, the device will prompt for a passcode upon:
- being turned on
- coming out of sleep
- reaching the lock timer limit
If you forget your passcode you will be given the option to Reset (lower left corner of keypad) the device after 3 failed attempts to enter the code. Note: clicking Reset will restore the device to its original settings and will delete all scans, history, accounts and preferences.
- Create Passcode – To turn on Passcode Protect, you first need to tap Create Passcode. Enter a 4 digit code twice to create and save the code.
- Lock [default is 30 mins] – If you have Passcode Protect turned on, you can set how quickly the device will lock after a period of non-use.
F. Maintenance
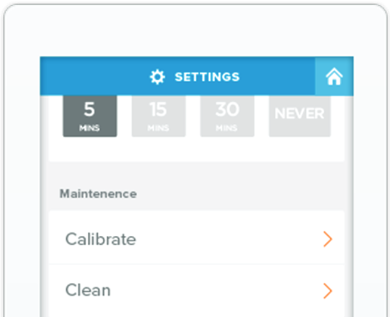
- Calibrate – Calibration ensures that your scanner is properly reading white, black, and gray tones. If scans appear faint or off balance, it’s time to calibrate. Note, your NeatConnect scanner is factory calibrated and tested so it should not need to be calibrated out of the box. Locate your calibration paper and follow the on-screen instructions. If you can't find your calibration page, use a blank white sheet or a page with only black and white on it.
- Clean – Cleaning will remove dust and other obstructions that have been caught in the scanner, improving your scan quality. Alcohol cleaning paper can be purchased online. See cleaning accessories for some options.
G. System

- View Interactive Tutorial – This allows you to go through the first time tutorial again.
- Factory Reset – This option lets you erase all current data on the scanner. This includes: all current scanned items on the internal memory, saved destinations, saved network settings, all personal items. This command resets the scanner back to the state when you first received the scanner.
- Software Update – NeatConnect will automatically notify you when there are new software updates available for download directly to itself. If you choose not to apply the update, tap this button to apply the update when you’re ready. Note that the typical software update takes about 10 mins to download and install.
- Serial Number (not shown) – The serial number of your scanner appears at the bottom of the settings screen.
- Mac Address (not shown) – The Mac Address of your scanner appears at the bottom of the settings screen.