Export Items from Neat
You can export item images and item data from Neat. You can export your items to the following file types: .PDF, .CSV, .TXF, .QIF, and .QFX.Please Note: For the following you will need to be logged in to the Neat web app.
FAQs
- How do I export items to a PDF file?
- How do I export items to a CSV file?
- How do I export items to a TXF file?
- How do I export items to a QIF file?
- How do I export items to a QFX file?
How do I export items to a PDF file?
There are three ways you can export images from Neat to PDF files.Please Note: At this time you can only export one item to PDF at a time. We understand the importance of this feature and are working to implement this in a future update.
Option 1
- Locate the item that you want to export to PDF and click the image icon in the image column to preview your image.
- In the preview image view, click the down arrow to export the image as a PDF.
- The PDF file will be downloaded to your computer and can be accessed in your downloads folder.
Option 2
- Locate the item you want to export to PDF and put a checkmark in front of the item.
- Then select Export.
- Select Image as PDF.
- The PDF file will be downloaded to your computer and can be accessed in your downloads folder.
Option 3
- Locate the item you want to export to PDF and double-click on the item to open it.
- Click the down arrow located above the item image.
- The PDF file will be downloaded to your computer and can be accessed in your downloads folder.
How do I export items to a CSV file?
Please Note: CSV export now supports all item types, not just receipts, as well as includes all primary fields for each item type!
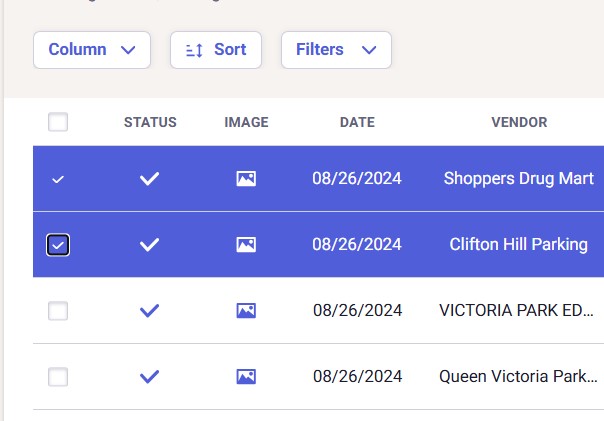
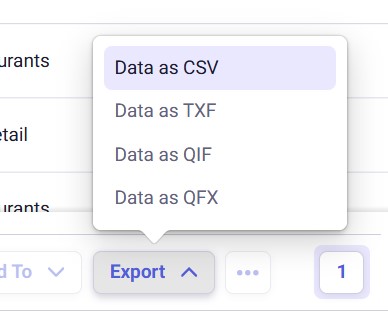
- Locate the item(s) you want to export to CSV and put a checkmark in front of the item(s).
- Select Export. Then select Data as CSV.
- Choose which data to export:
- Current Page of all items currently showing in the grid or
- All Items in the Folder/Filter.
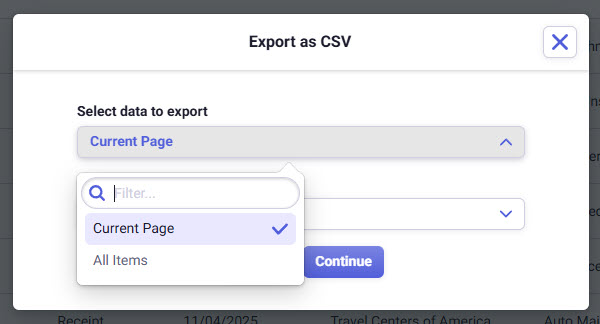
- Choose which columns to export:
- Current Grid Columns or
- All Columns in the Folder/Filter.

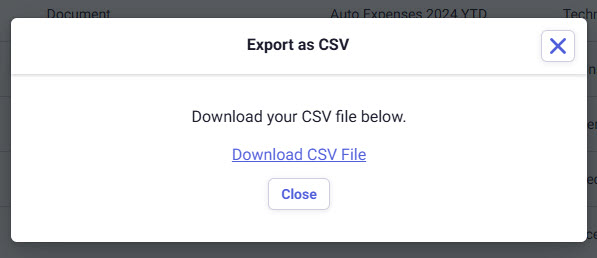
- After selecting Continue, click the Download CSV File link to save your selected data in your computer's Downloads folder.
Then Close the window.
How do I export items to a TXF file?
Please Note: Only receipts can be exported to a TXF file.
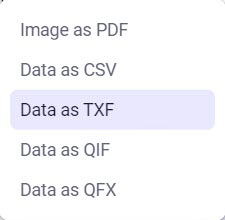
- Locate the receipt(s) you want to export to TXF and put a checkmark in front of the receipt(s).
- Then select Export.

- Select Data as TXF.
- The TXF file will be downloaded to your computer and can be accessed in your downloads folder.
How do I export items to a QIF file?
Please Note: Only receipts can be exported to a QIF file.
Before you can export receipts to a QIF file, you will need to first import your Quicken account QIF file to Neat
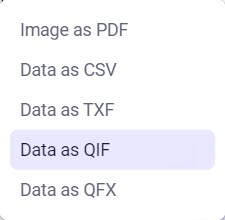
- Locate the receipt(s) you want to export to QIF and put a checkmark in front of the receipt(s).
- Then select Export.
- Select Data as QIF.
- A Create QIF File box will open.
- If you haven’t imported your Quicken account QIF file yet, then click Import.
Browse your computer files to your Quicken account QIF file and select it.
Once your Quicken account QIF file is imported, it will show up in the drop-down list of available Quicken accounts. - If you have already imported your Quicken account file, then select which account you want your data to be associated with from the drop-down list.
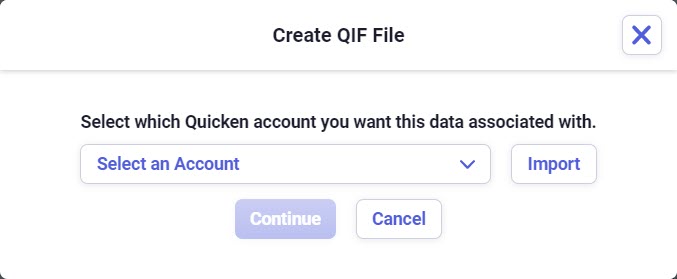
- If you haven’t imported your Quicken account QIF file yet, then click Import.
- Then select Continue.
- The QIF file will be downloaded to your computer and can be accessed in your downloads folder.
How do I export items to a QFX file?
Please Note: Only receipts can be exported to a QXF file.
- Locate the receipt(s) you want to export to QFX and put a checkmark in front of the receipt(s).
- Then select Export.
- Select Data as QFX.

- The QFX file will be downloaded to your computer and can be accessed in your downloads folder.