Splitting Receipts in Neat
You asked, we listened! Receipt Splitting is here!We’re excited to announce the release of one of our most requested features: the ability to split receipts in your Neat file cabinet!
Now you can easily divide a single receipt into multiple copies, and edit each as needed for tracking expenses across different categories, projects, or clients. Whether you’re managing shared purchases, separating personal and business expenses, or allocating costs to multiple accounts, receipt splitting gives you the flexibility and control you’ve been asking for.
Here’s everything you need to know to start using Receipt Splitting in Neat:
- Why split receipts?
- How do I split receipts?
- What do I do if there is no Sales Tax or GST/PST field when splitting receipts?
Why split receipts?
Sometimes a single purchase covers more than one type of expense, and that’s where receipt splitting comes in handy. Splitting a receipt allows you to itemize different expenditures from one receipt, each with its own category, amount, or project.You might want to split a receipt when:
- The purchase includes both business and personal items, and you need to keep them separate.
- You’re tracking different expense categories on one receipt, such as differentiating between business meals and travel expenses, or office supplies and postage/shipping.
- Multiple clients, projects, or departments share the cost of a single purchase.
- You need to separate reimbursable and non-reimbursable items for accurate reporting.
- You want cleaner bookkeeping and more accurate tax records, with every item properly categorized.
How do I split receipts?
-
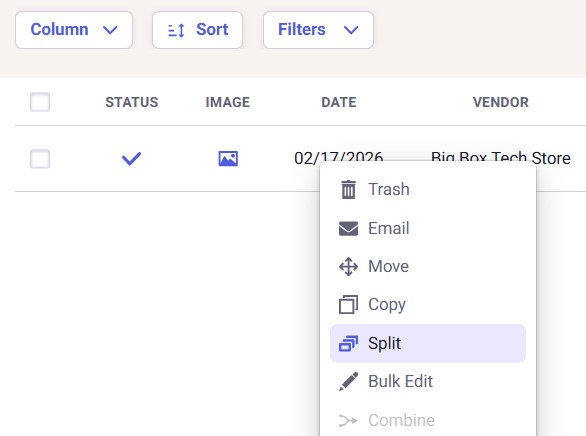
Right-click on the receipt and click Split from the action menu drop-down.
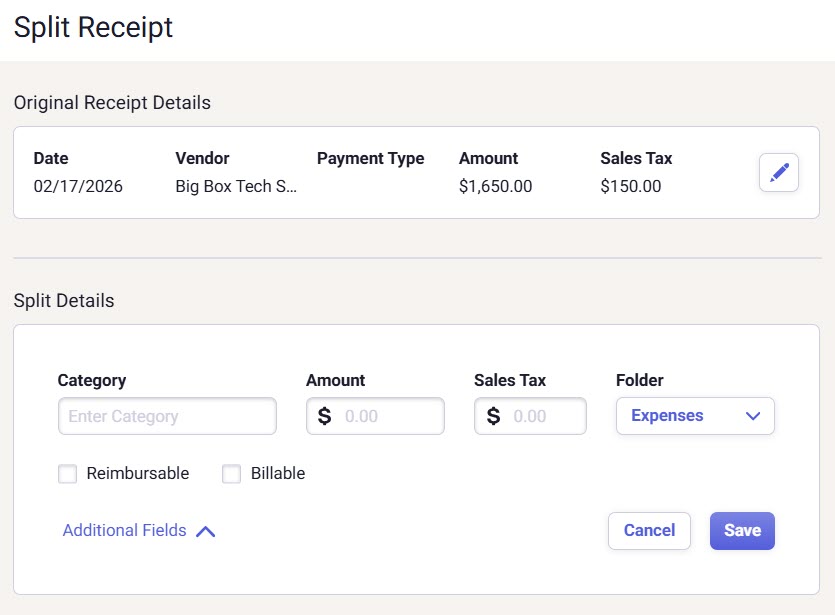
- The Split Receipt window will open. Your original receipt details are shown at the top for reference.
-
Under Split Details, you will see the first line item ready to edit. You can set the following details:
- Category, Amount, Sales Tax, Folder
- Check the box for Reimbursable/Billable to set the status.
- (Optional) Click Additional Fields to add more details like Projects, Clients, Notes, or Payment Type.
- Please Note: The amount values of the splits should be INCLUSIVE of tax amounts. Just like a normal receipt, the total amount includes tax.
-
Once you have finished editing the first line item, click the Save + Add New button. This saves your first split and prepares a new, blank line item for you.

-
For each new line item, Neat will automatically calculate the Amount and Sales Tax based on the remaining balance from the original receipt. You can keep these suggested amounts or change them as needed.
- If you change the amount, you will need to create additional splits to use the remaining balance.
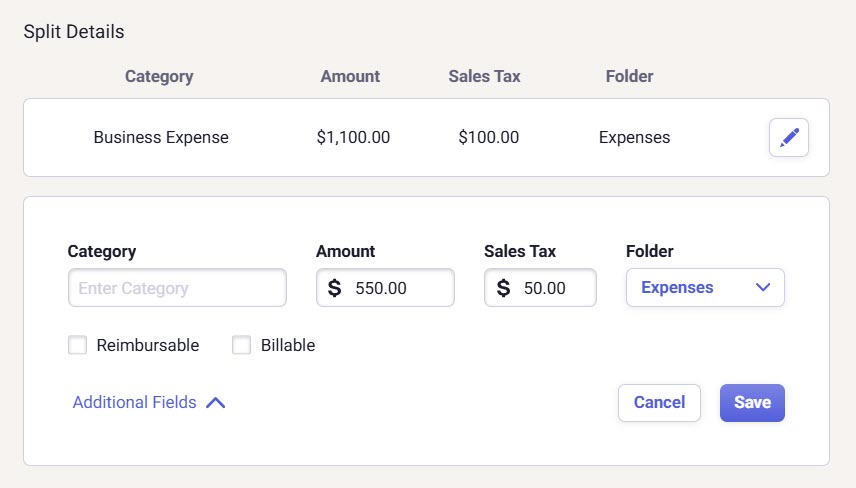
- Edit all other fields (Category, Folder, Additional Fields, etc.) for the current line item.
- Click Save after each line item you complete. Click Add if you need to create another split.
- As you work, monitor the balance indicator at the bottom of the window:
- 🔴 Red Text: The split amounts are unbalanced. The total of your line items does not equal the original receipt's total. You can keep working, but will not be able to finish the entire process until this is resolved.
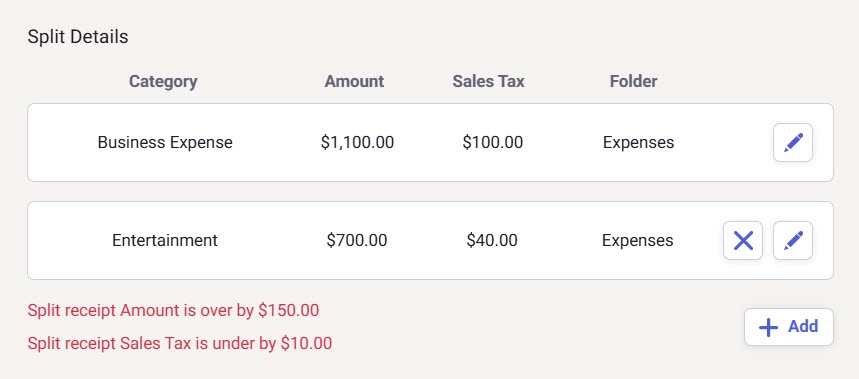
- 🟢 Green Text: The split amounts are balanced. The totals match. The Split button is available now.

- 🔴 Red Text: The split amounts are unbalanced. The total of your line items does not equal the original receipt's total. You can keep working, but will not be able to finish the entire process until this is resolved.
- Finalize the Split:
- Continue adding and editing line items until you have accounted for the entire original receipt and the balance indicator turns green, showing "Split receipt balance is matched."
- Review each line for accuracy. You can edit any saved line item by clicking the pencil (edit) icon next to it.
- Once balanced, the Split button in the lower-left corner will become active.
- Click Split to save all your changes and complete the process.
-
Each line item has its own Save button. Always save your changes to a line item before moving on. You can always make changes by clicking the pencil icon.
-
You can't finalize until it's balanced. The Split button will only work when the total of all your split Amounts and Sales Tax equals the original receipt's total.
-
Use the auto-populated amounts to save time, as they automatically track the remaining balance for you.
-
Amount is the total receipt amount including sales tax. Sales Tax is also listed separately for easy tracking and reporting.
-
Currently, you can only split a receipt up to 10 times. For now, the recommended workaround is to split the first 9 then leave the rest in the 10th split. Once you've split the first ten, go back and continue to split the last one until you are finished.

What do I do if there is no Sales Tax or GST/PST field when splitting receipts?
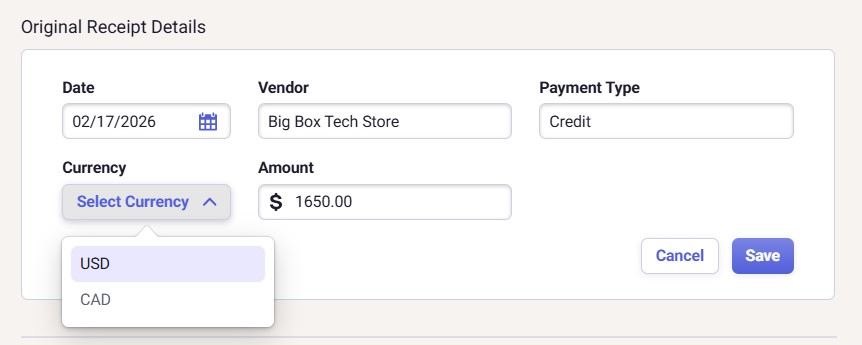
This can happen if the receipt was manually created and no currency was selected when it was created.You can resolve this when you click Split, by clicking the pencil icon for the Original Receipt Details and selecting a currency. Immediately, the Sales Tax or GST/PST field will appear.
Select USD for the Sales Tax field.
Select CAD for the GST/PST fields.